
Kapwing for Teachers: A Practical, Privacy-Aware Video Editing Guide
Kapwing is a browser-based editor for video, images, audio, and GIFs. Teachers can use it to trim clips, arrange media on a timeline, record a screen, add text, generate and edit captions, resize a project, and export a finished file without installing a traditional desktop editor.
It can be a practical option for short teacher-created videos, but “easy to use” does not mean “automatically appropriate for every classroom.” Plans and limits change, student privacy rules still apply, automatic captions require review, and Kapwing’s privacy policy says only students over age 13 are eligible to use its services. This guide explains what the tool currently offers, how to test it safely, and where it fits instructionally.
What changed since this article was first published
The original 2021 article described a generous free plan and an affordable upgrade. Kapwing still offers a free plan, but the details are different. As of August 2026, the company’s official pricing page lists watermarked exports, a four-minute maximum finished video, 720p export quality, a monthly export-time limit, and limited credits for features such as automatic subtitles on the free tier. Paid plans remove or raise many of those limits. Because product plans change, check the live pricing page before planning an assignment or purchase.
Kapwing also has an education page, but it currently says new applications to the Kapwing for Education program are paused. Teachers can still test the general free version; they should not plan a course around receiving an education upgrade that is not presently available.
Why the original recommendation made sense
The author first tried Kapwing while organizing years of personal photographs and phone videos. He had studied photography and video before teaching but had not kept up with the transition from film and VHS-era editing to current digital tools. More powerful editors he tested felt like more complexity than a small home-video project required; Kapwing provided a more approachable way back into editing.
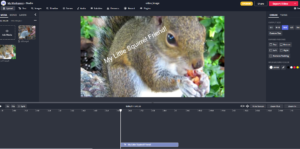
That remains a sensible way for a teacher to evaluate any creative tool: begin with unimportant, nonstudent media and complete a very small project. You can learn the interface, discover the export limits, and decide whether the workflow saves time before uploading instructional or student content.
First: check approval, age limits, and privacy
Before asking students to create accounts or upload files, check whether the service is approved by your school or district. The U.S. Department of Education’s student-privacy guidance for online tools tells teachers to consult school or district administrators and IT staff first. An attractive classroom use does not override FERPA obligations, district contracts, record-retention rules, parental-consent requirements, or local policies.
Kapwing’s privacy policy states that only students over age 13 are eligible to use Kapwing services, including Kapwing for Education. That means a teacher-created video may be an option in an elementary classroom, but directing younger students to create Kapwing accounts is not.
For any age group:
- Do not upload student names, faces, voices, grades, disability information, or other identifiable records unless the district has approved that use.
- Use test footage, licensed stock media, or teacher-created examples while evaluating the service.
- Review workspace and sharing settings before distributing a project link. “Unlisted” is not the same as access restricted to an authenticated class.
- Download the final file and publish it through a district-approved learning platform when that is the safer option.
- Know who owns the account and how projects will be removed when the course or subscription ends.
A fast teacher test: make one 60-second explanation
Use a small instructional goal rather than trying every feature. A one-minute vocabulary explanation, worked example, or lab-procedure preview is enough to judge the basic workflow.
1. Write the purpose before opening the editor
Choose one learning target and write a short script. Decide what students should know or notice after viewing. This keeps the video connected to lesson planning instead of letting transitions, templates, and effects drive the lesson.
2. Gather media you may legally use
Use your own recording, district-licensed materials, public-domain media, or assets whose license permits the intended use. A tool’s ability to import something from the web does not establish permission to republish it. Keep a simple note of the creator, source, and license for any asset you did not make.
3. Upload and organize the timeline
Create a project, choose the intended frame size, and add the main clip. Trim dead time, split obvious errors, and place visuals where they clarify the explanation. Avoid decorative movement that competes with the important information.
4. Add titles and visual cues
Use large, readable text and consistent placement. Keep essential text on screen long enough to read. Highlight a step, term, or feature when the narration refers to it. A video is not more engaging merely because it moves; students need a meaningful reason to attend and respond.
5. Generate captions, then edit them
Automatic captioning can save time, but it is a draft. Check names, subject-specific vocabulary, numbers, punctuation, and the timing of each line. Captions should represent important spoken information and relevant sounds. Provide a transcript or equivalent text when students may need to search, translate, print, or review the explanation at their own pace.
Correct captions can also support the vocabulary and comprehension work described in strategies for English learners. Translation features may help create a starting point, but a fluent reviewer should check important translated material before students rely on it.
6. Export and test the actual student experience
Preview the finished video on a student-sized device, with sound off and captions on, and on an ordinary school connection. Confirm that text is legible, audio is understandable, links work, and the file opens inside the district platform. If the watermark, length, resolution, or monthly limits interfere with the lesson, reconsider the project or compare an approved alternative before paying for an upgrade.
Five useful classroom applications
1. A short flipped-lesson preview
Record one explanation or worked example for students to preview, then use class time for coached practice. A successful flipped classroom needs an in-school access option and a quick bridge for students who did not complete the preview.
2. A replayable procedure
Create a brief demonstration of a laboratory setup, art technique, software process, or multistep routine. Pair it with concise written steps. Video can reduce repeated explanations, but it does not replace direct supervision where safety is involved.
3. A worked example with error analysis
Show one correct example, pause before a common error, and ask students to explain what should happen next. The follow-up question matters more than polished production. Use purposeful questions to turn viewing into thinking.
4. Teacher feedback on a process
A short screen recording can point to specific parts of a draft, solution, design, or presentation. Avoid saying private grades or sensitive information in a file that can be shared by link. Whenever possible, place the final file in the district’s approved system and give students a written next step.
5. A student multimedia product—when approved
Older students can combine narration, images, citations, and captions to explain a concept or present an argument. Treat the project as alternative assessment: grade the disciplinary learning with a clear rubric, not professional editing skill or access to premium features. Offer a nonvideo way to demonstrate the same target.
A practical student project structure
- Question: Give students a focused content question, audience, and length limit.
- Plan: Require a storyboard or outline before editing.
- Source: Ask students to document media and information sources.
- Create: Provide a small approved feature set rather than rewarding unnecessary effects.
- Check access: Review captions, narration, text size, contrast, and any essential visual information.
- Peer response: Use a structured protocol focused on clarity and evidence.
- Revise and reflect: Ask what changed and why.
This structure connects video production with collaborative learning while keeping individual accountability visible. If students work in groups, assign rotating roles and require each learner to explain the content rather than grading only the final export.
When Kapwing is not the right choice
Choose a different workflow when students are 13 or younger, the district has not approved the service, the project contains sensitive student information, reliable internet is unavailable, or the free-plan limits undermine the assignment. A district-supported editor may offer single sign-on, controlled sharing, stronger administrative terms, or better integration with existing devices.
Also consider teacher workload. A concise, clear video can support personalized learning, but producing a large video library is not automatically a good use of planning time. Reuse a strong existing resource when it fits, and reserve original production for explanations that truly benefit from your examples, sequence, or local context.
Bottom line
Kapwing remains a capable browser-based editor that teachers can test without installing software. Its timeline, screen recording, text, resizing, and caption tools can support short instructional videos and approved student multimedia work. The responsible recommendation is narrower than “perfect for teachers”: verify the current plan, follow district approval and privacy rules, respect the over-13 eligibility policy, review every caption, and test one small project before committing time or money.
Sources and current product information
- Kapwing pricing and plan comparison (checked August 12, 2026)
- Kapwing for Education (program status and education features)
- Kapwing Privacy Policy (including student age eligibility)
- U.S. Department of Education: Using online tools and applications under FERPA
